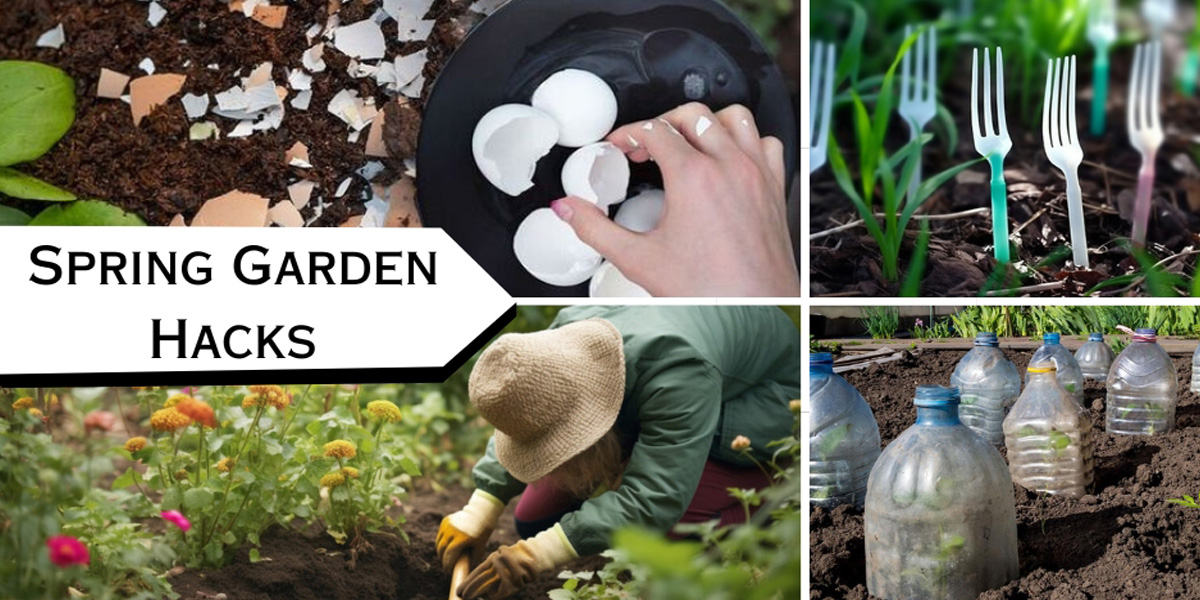
Get ready to transform your garden into a beautiful oasis this spring! These 40 amazing garden hacks will make your neighbors jealous. You won’t believe how simple and effective they are. You can use everyday items like baking soda, plastic forks, pantyhose, cinnamon, and even toilet paper to enhance your garden.
Don’t throw these things away – repurpose them and watch your garden thrive! With these creative hacks, your garden will be bursting with life, color, and fragrance. Say goodbye to boring gardening routines and embrace the fun and creativity. Get ready to become a gardening expert and impress everyone with your amazing garden!
You’ll be amazed by what everyday items can do for your garden! Did you know that baking soda, plastic forks, pantyhose, cinnamon, and even toilet paper can be used in surprising ways to improve your garden?
You probably have these items at home, and instead of throwing them away, why not repurpose them to make your garden beautiful for spring or even summer? These creative hacks will make your garden thrive like never before.
Get ready to unleash your creativity and take your garden to the next level! Imagine yourself as a garden artist, using clever and exciting hacks to make your outdoor space vibrant and breathtaking. With these simple yet powerful techniques, your garden will come alive with buzzing life, vibrant colors, and the delightful scent of blooming flowers.
Say goodbye to boring gardening routines and embrace a world of fun and imagination. There are no limits to what you can create! So get ready, roll up your sleeves, and let the magic of these amazing spring garden hacks bring out your true gardening talent. Everyone will be amazed by your horticultural masterpiece!
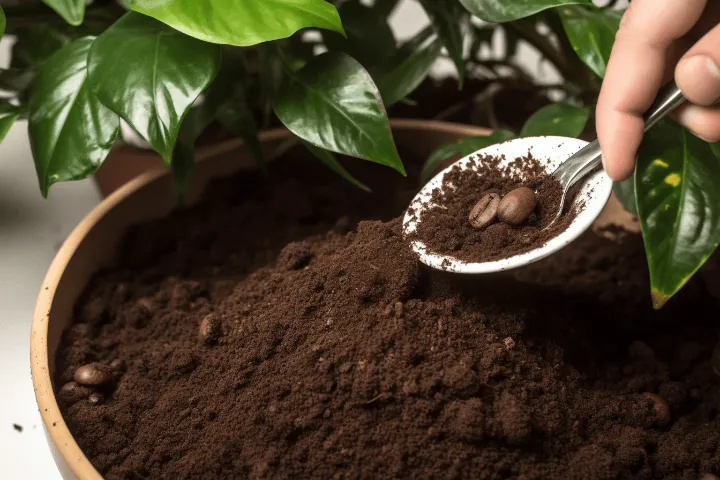
1. Coffee Grounds For Plant Nutrition
Coffee Grounds for Plant Nutrition
Did you know that your garden can benefit from your caffeine addiction? Instead of throwing away used coffee grounds, you can compost them and give them a new purpose. Coffee grounds are packed with nutrients and can provide a nitrogen boost to your compost pile. You can even use them as a fertilizer on their own. Just make sure to rinse the grounds or use the used ones, as fresh grounds can be acidic. Coffee grounds can also be used as mulch, to keep pests away, and as food for worms. They are a versatile tool for your garden!
What about using fresh coffee grounds? While it’s not always recommended, there are some situations where they can be beneficial. For example, you can sprinkle them around acid-loving plants like azaleas, hydrangeas, blueberries, and lilies. Some vegetables may also benefit from the slight acidity, but tomatoes may not be as fond of it.
Fresh coffee grounds can even help suppress weeds and certain fungal pathogens, but you need to be careful as they can also have a negative impact on some plants. Whether you’re composting or using coffee grounds directly in your garden, one thing is certain: these little beans can give your plants an energy boost, just like they do for you!
2. Spring Weeding: Time Your Attack for Maximum Effectiveness
Spring Weeding: Time Your Attack for Maximum Effectiveness
As spring arrives, it’s time to tackle those pesky weeds that have been lying dormant during the winter months. Proper timing and technique are crucial to making your spring weeding efforts successful and ensuring a weed-free garden throughout the season.
Begin weeding when the soil is moist and slightly warm, typically after a rainfall or after watering your garden. Weeds are easier to pull out when the ground is soft, allowing you to remove the entire root system without breaking it. Removing the whole root is essential, as many weeds can regrow from leftover fragments.
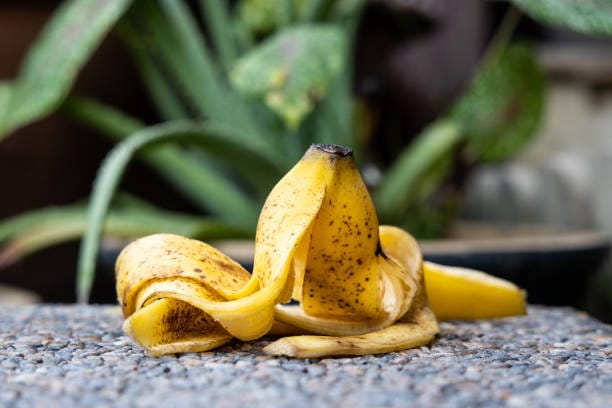
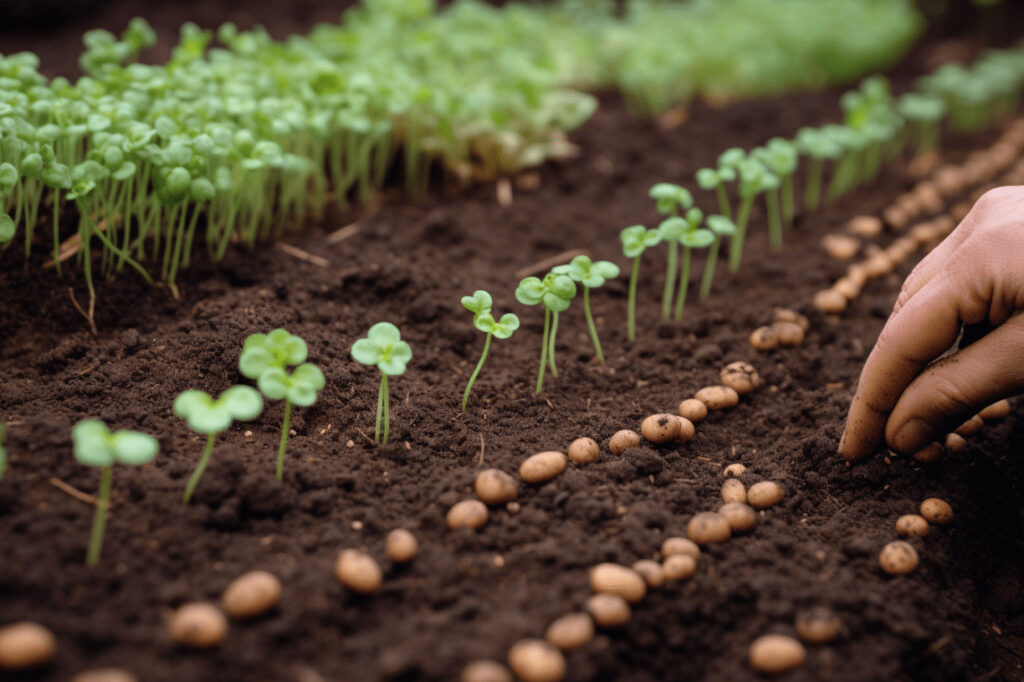
3. Put bananas In Your Garden
Put bananas In Your Garden
Bananas are not only tasty and nutritious, but they can also benefit your garden in several ways. Here are some reasons to consider using bananas in your garden:
Bananas are a natural source of potassium, an essential nutrient for plants.
Adding banana peels to compost or soil provides potassium to your plants.
Banana decomposition adds organic matter, improving soil structure and fertility.
Banana flowers and fruits attract beneficial insects like bees and butterflies.
Banana leaves and peels can act as natural mulch, retaining moisture and suppressing weeds.
Banana plants provide shade, protecting your plants from excessive sunlight.
Using bananas in your garden is a versatile and beneficial way to enhance plant growth and overall garden health.
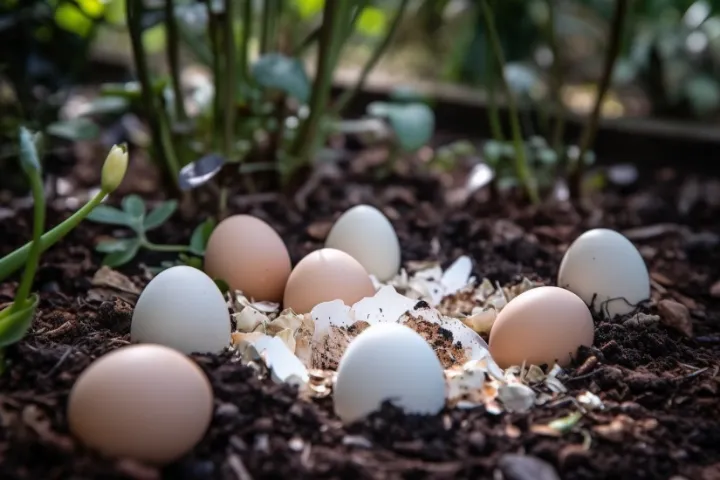
4. Unleash The Power Of Eggshells: Eggshells For Pest Control
Unleash the Power of Eggshells: Eggshells for Pest Control
Did you know that crushed eggshells can keep pests like slugs and snails away from your plants? Not only that, but they also provide a good amount of calcium, which is beneficial for your plants’ health. It’s a simple and organic way to protect your plants and keep them pest-free. The best part is that you’re repurposing something you would have thrown away, making your garden more sustainable.
Next time you make an omelet, remember to save those eggshells! Instead of throwing them away, use their garden-boosting powers to help your plants thrive and keep pests away. It’s a simple way to make your garden flourish!
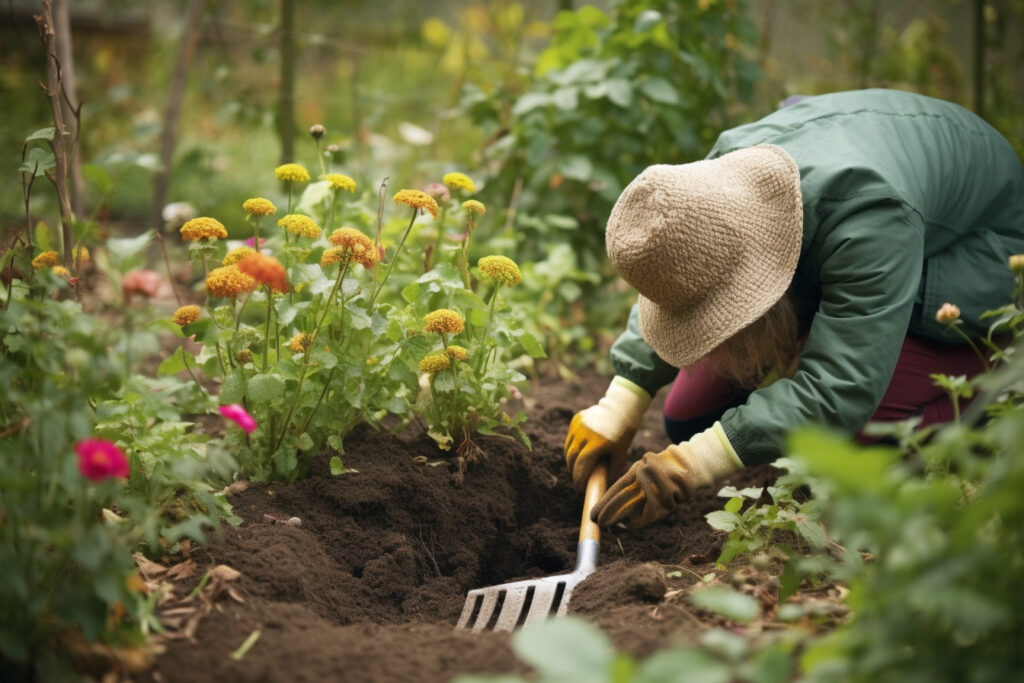
5. Weed Early And Often
Weed Early and Often
Every gardener wants a beautiful garden without weeds. The key to achieving this is by being proactive and weeding early in the season, and doing it regularly. Weeds are easier to remove when they’re small and their roots aren’t strong yet. By consistently weeding, you’ll prevent them from taking over your garden and spreading their seeds. If you deal with weeds from the beginning, you’ll spend less time fighting them in the future and more time enjoying your garden.
Consistency is key in keeping a beautiful garden. By sticking to a regular weeding schedule, you can make sure no weed goes unnoticed and protect the plants you’ve carefully nurtured. This disciplined approach maintains the beauty of your garden and prevents weeds from taking over.
By staying on top of weeding, you give your garden the best chance to flourish, saving yourself time, effort, and frustration in the future. So, grab your gardening tools and enjoy the satisfying process of creating a weed-free paradise.
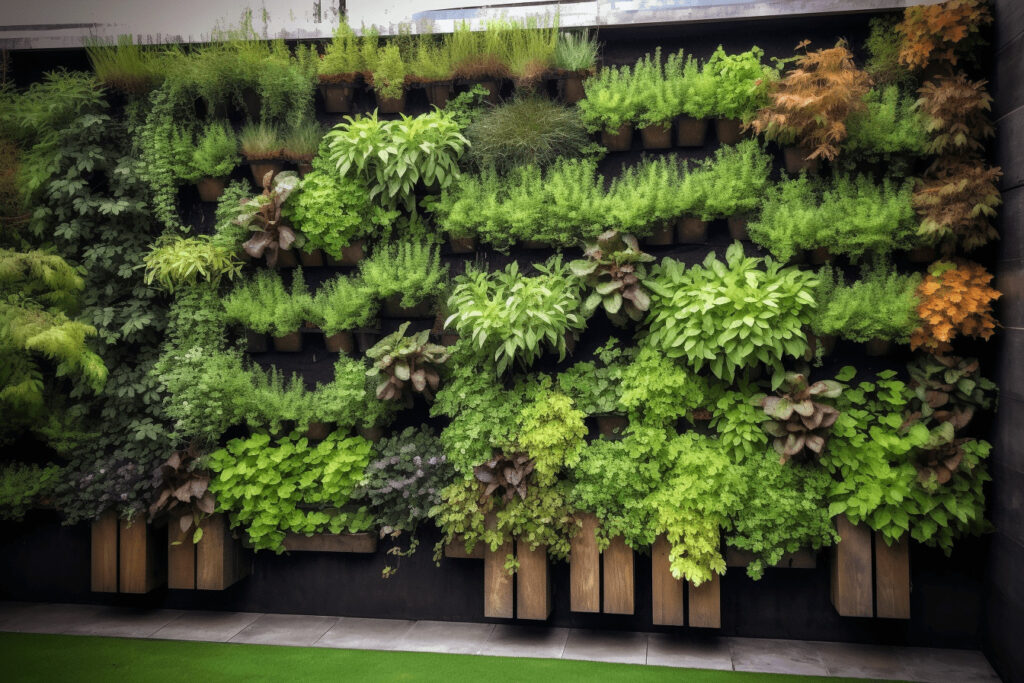
6. Vertical Gardening
Vertical Gardening
Turn your small outdoor area into a thriving garden with vertical gardening! This clever technique lets you grow plants upwards instead of outwards, which is great for limited spaces. It’s also easier on your back and can lead to healthier plants because they get more fresh air and sunlight. To begin, pick plants like pole beans, climbing peas, and vining tomatoes, and find a spot that gets 6 to 8 hours of direct sunlight.
There are many ways to support your vertical garden, such as using trellises, tripods, arches, and pergolas. You can also get creative and repurpose items like 2-liter soda bottles, gutters, and PVC pipes. When choosing a support structure, think about how much sunlight and wind it will get, the size of your plants, and how easy it will be to maintain.
For example, trellises work well for pole beans and sweet peas, while sturdier structures are better for grapevines. If you enjoy DIY projects, you can even make a vertical planter from an old wooden pallet. Just make sure it’s safe to use, smooth out any rough edges, and attach a backing before planting. With vertical gardening, you have endless possibilities!
7. Rainwater Collection
Rainwater Collection
Help your plants and save water and money by using rain barrels! These big drums gather rainwater from your roof, which lowers your water bill and gives your garden natural, chemical-free water. As water restrictions become more frequent because of hotter summers and growing populations, having a rain barrel is a smart choice for your yard. Did you know that a roof measuring 20×30 feet can collect as much as 360 gallons of water with just one inch of rainfall? That’s a generous amount of free water for your plants!
Setting up and taking care of rain barrels is simple, whether you buy a pre-made one or make your own. If you choose to DIY, you can repurpose a trash can or juice barrel, install a spigot, and connect a downspout to direct the water. Keep your rain barrel clean using non-toxic solutions like vinegar and store it upside down in a protected area during the winter. Remember, the water collected in rain barrels is not suitable for drinking but works great for your garden. Embrace the benefits of rain barrels and provide your plants with the water they need!
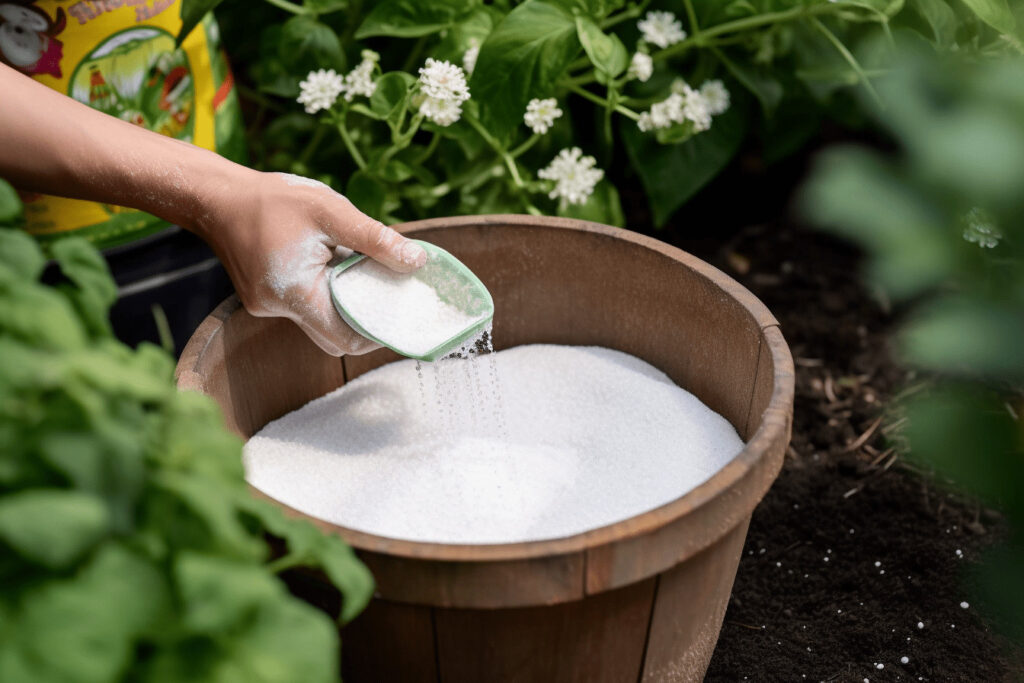
8. Epsom Salt for Improved Plant Growth
Epsom Salt for Improved Plant Growth
Epsom salt, also known as Magnesium Sulfate, is a fantastic and affordable supplement for organic gardening. It has a special chemical structure that enhances the effectiveness of fertilizer and improves the health of the soil, resulting in vibrant lawns, beautiful roses, and thriving plants. Epsom salt is rich in magnesium and sulfate, which are essential minerals for plants. Unlike regular fertilizers, it doesn’t build up in the soil over time, making it a safer option compared to chemical soil supplements.
Add a little Epsom salt to your garden and see your plants grow beautifully! For potted plants, mix two tablespoons of Epsom salt with a gallon of water and use this mixture instead of regular watering once a month. When planting seeds or transplants, add one or two tablespoons of Epsom salt to the soil to give your plants a healthy start.
Epsom salt is especially beneficial for tomatoes and peppers, as it prevents magnesium deficiency and helps them produce bigger and more vibrant fruits. Your flower garden will also bloom more beautifully with the use of Epsom salt, creating the serene and stunning environment you’ve always dreamed of.
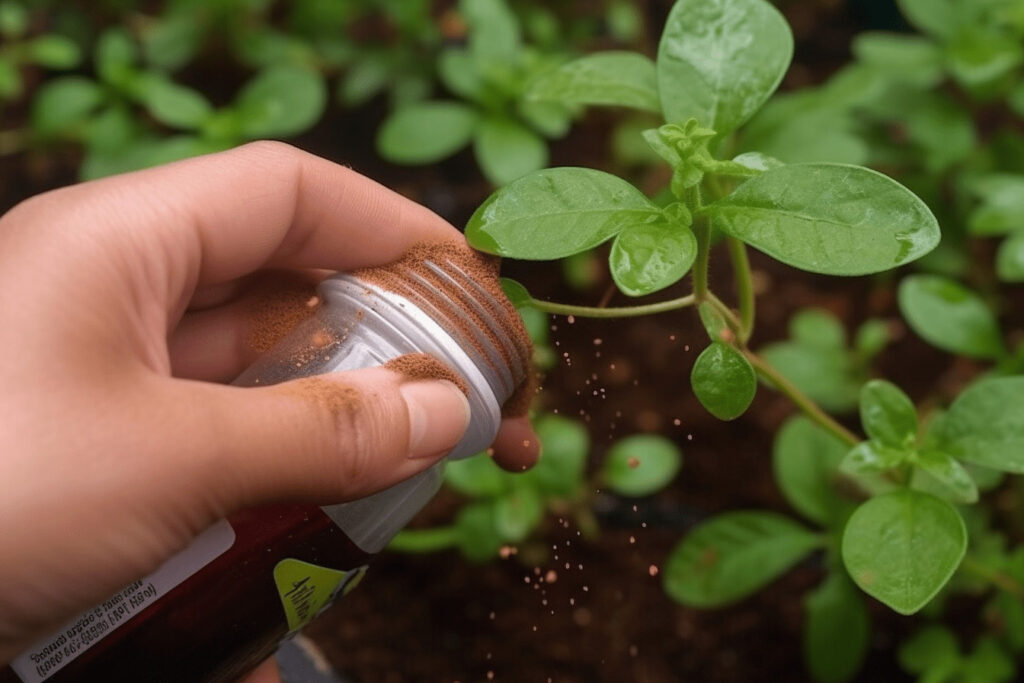
9. Use Cinnamon To Prevent Fungus
Use Cinnamon To Prevent Fungus
Cinnamon is not only delicious in cooking but also a superhero in the garden! Using cinnamon on your seedlings can protect them from damping-off, a harmful fungal disease that can harm young plants. Cinnamon has strong antifungal properties, making it a natural and effective way to safeguard your delicate seedlings. Simply sprinkle a little cinnamon on the soil surface to create a protective barrier against fungal spores. This helps your plants grow and thrive in a healthy environment.
Besides protecting against damping-off, cinnamon also improves the overall health and growth of your garden plants. It acts as a natural fungicide, which means you can avoid using chemical alternatives.
This not only makes your garden safer and more environmentally friendly but also reduces the risk of harming beneficial organisms in the soil. By incorporating cinnamon into your gardening practices, you are creating a sustainable and chemical-free environment that promotes the growth and success of your plants, resulting in a fruitful and thriving garden.
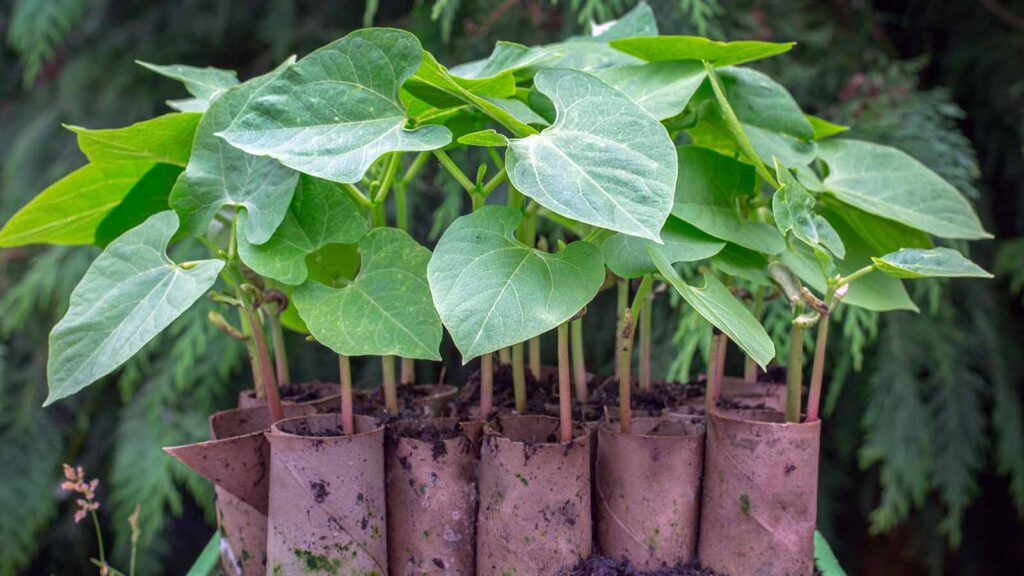
10. Biodegradable Seedling Pots
Biodegradable Seedling Pots
Using plastic containers or repurposed items like old newspapers as starter pots for seeds or seedlings in your garden is an easy and budget-friendly approach to gardening. Here are some advantages of using plastic containers, such as yogurt cups or takeout containers, as starter pots:
Cost-effective: Plastic containers can be found easily and are often free or inexpensive. Repurposing them as starter pots helps you save money on buying new pots.
Recycling and waste reduction: By reusing plastic containers, you contribute to reducing waste and promoting recycling. It’s an eco-friendly way to give these items a second life.
Convenience: Plastic containers are lightweight, making them easy to handle and move around as needed. They are also readily available, allowing you to start your gardening projects quickly.
Drainage: Many plastic containers come with pre-drilled drainage holes or can be easily pierced, ensuring proper water drainage for your seedlings’ healthy growth.
Transplanting ease: When it’s time to transplant your seedlings into larger pots or directly into the ground, plastic containers make it simple. You can gently remove the seedling along with the pot, minimizing root disturbance.
Overall, using plastic containers as starter pots offers a practical and eco-friendly solution for beginning your gardening journey.
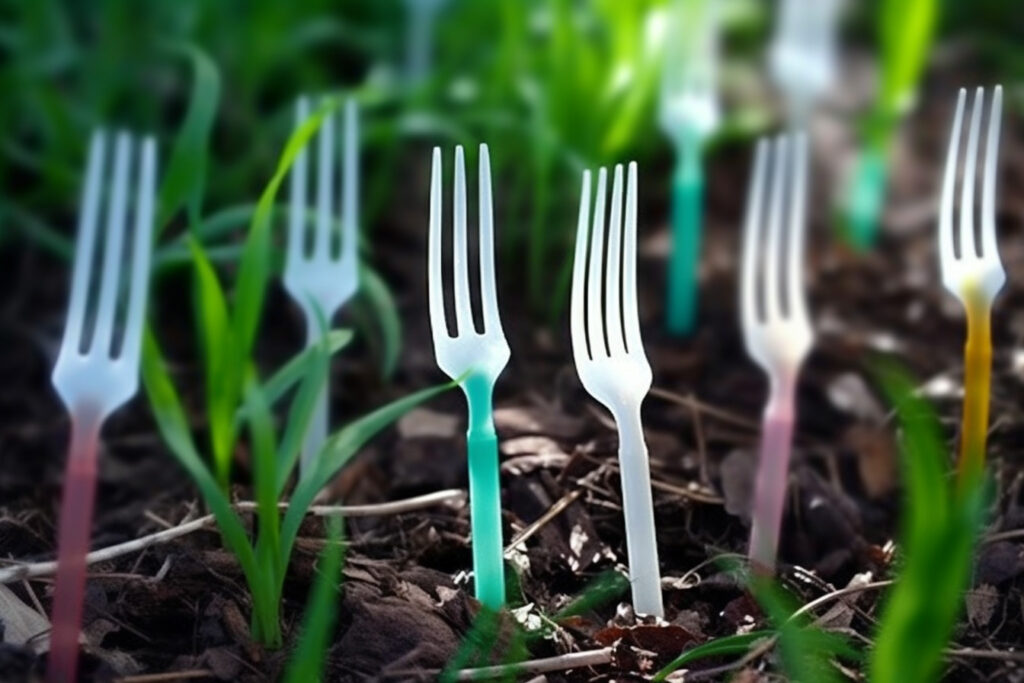
11. Use Plastic Forks for Pest Control
Use Plastic Forks for Pest Control
Picture this: after months of nurturing and caring for your garden, you find that mischievous critters from the neighborhood are wreaking havoc on your beloved plants. But fret not, fellow gardeners! A clever and simple solution is here, and it involves none other than plastic forks. Yes, you heard it right—plastic forks! These unassuming utensils, often discarded after takeout meals, can become the heroes of your garden, protecting your plants from being trampled on or devoured by animals.
To deter small animals like rabbits and squirrels from disturbing your garden, simply position plastic forks around your plants with the tines facing upward. This ingenious and cost-effective technique effectively protects your plants without causing harm to the animals. Additionally, it provides a creative way to repurpose plastic forks, reducing waste and promoting an eco-friendly garden.
But that’s not all! These versatile forks can be transformed into affordable and customizable plant labels or even fences to protect your plants from pesky critters. Unleash your creativity by painting and decorating the forks, turning them into charming garden ornaments that are both practical and visually appealing. So, the next time you order takeout, remember to save those plastic forks and witness your garden flourish, free from unwanted critters!
12. Spring Weeding: Use a Pre-Emergent Herbicide
Spring Weeding: Use a Pre-Emergent Herbicide
Every gardener dreads the presence of pesky weeds in their well-maintained lawn. While herbicides can be helpful, it’s important to know when and which ones to use. Enter pre-emergent herbicides, the unsung heroes in the fight against weeds before they even sprout. These chemical compounds specifically target the young root systems of weeds, preventing them from growing and emerging.
Although you may not witness the battle taking place, rest assured that the war against weeds is happening right beneath the surface. The timing, weather conditions, and the specific type of weed are crucial factors in selecting the right pre-emergent formula and applying it effectively.
Pre-emergent herbicides work by targeting and killing the delicate root tissue of newly germinated weed seedlings, leading to their complete demise. However, they are not effective against buds sprouting from existing roots or rhizomes and cannot be used on areas where grass seeds have been planted. Rest assured, established plants with developed root systems are not at risk.
Timing is crucial: apply pre-emergents in autumn for winter annuals and in spring for summer annuals. Remember, water is necessary to activate the herbicide and carry it to the roots. Avoid spraying on windy days, ensure temperatures are above freezing, and always refer to the manufacturer’s instructions for the most effective application methods. Happy weeding!
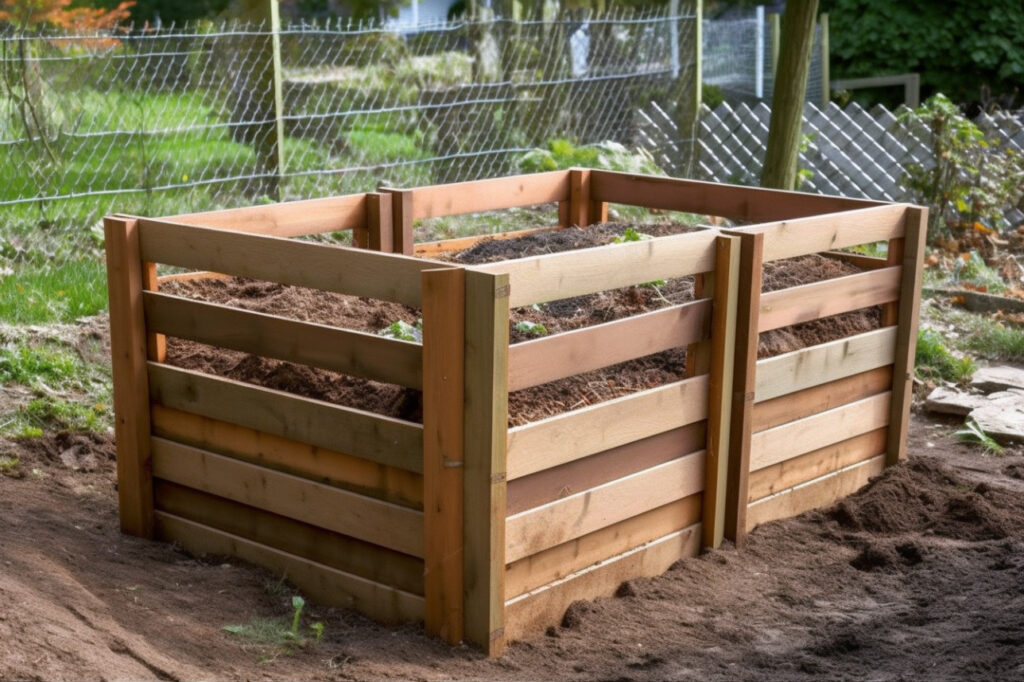
13. DIY Compost Bin
DIY Compost Bin
If you’re searching for an enjoyable and environmentally friendly weekend project, consider making your own compost bin using wood pallets or wire mesh. This DIY endeavor allows you to convert organic waste into a valuable resource for your garden. By recycling kitchen scraps and yard waste, you’ll provide your garden with nutrient-rich compost.
Over time, you’ll witness the fascinating process of decomposition, as your discarded waste transforms into a dark, crumbly soil amendment that your plants will thrive on. It’s a fantastic way to reduce waste and give your garden a natural boost!
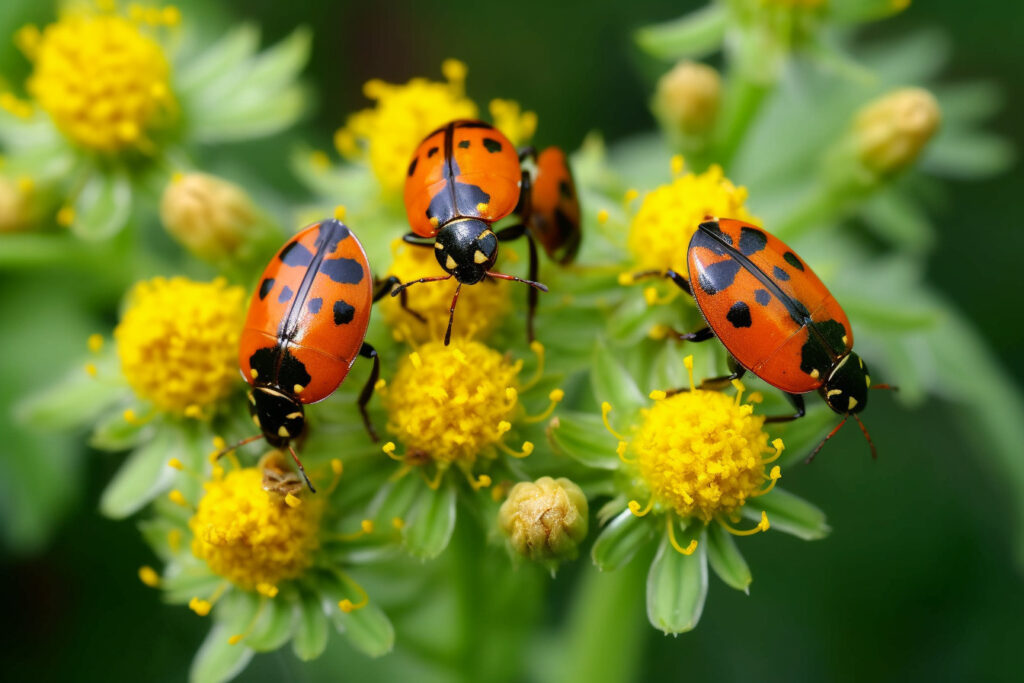
14. Attract Beneficial Insects
Attract Beneficial Insects
Creating a garden that attracts beneficial insects is like hosting a fantastic party for nature’s superheroes. When you plant colorful flowers like marigolds, yarrow, and fennel in your garden, you’re giving a warm welcome to the insect world’s VIPs. These amazing plants attract important allies such as ladybugs, lacewings, and parasitic wasps, who come with a strong appetite for garden pests. As they enjoy a feast on unwelcome intruders, these helpful insects naturally and sustainably keep your garden healthy and in excellent condition.
But the advantages don’t stop there. These vibrant plants that attract insects also enhance the visual appeal of your garden, making it a lively and vibrant space. Each blossom brings a splash of visual excitement, transforming your garden into a diverse and visually striking environment that you and your newfound insect friends can appreciate.
So, why not extend a warm welcome to these helpful bugs? By planting marigolds, yarrow, and fennel, you’ll establish a thriving ecosystem where both plants and insects can thrive. All the while, you’ll take pleasure in the beauty and charm of your garden’s newfound allure.
15. Newspaper Weed Barrier
Newspaper Weed Barrier
An effective and chemical-free way to suppress weeds in your garden is to lay sheets of newspaper before applying mulch. The newspaper acts as a barrier that hinders weed growth while gradually decomposing and enriching the soil. This organic and budget-friendly technique will help keep your garden free from weeds, enabling your plants to thrive.
Newspaper serves as an excellent weed deterrent. Before applying newspaper, ensure the soil is damp. Place multiple sheets (or a compact segment) on your garden walkways, and cover them with a generous layer of mulch. In areas prone to strong winds, secure the paper with landscape staples to prevent displacement.
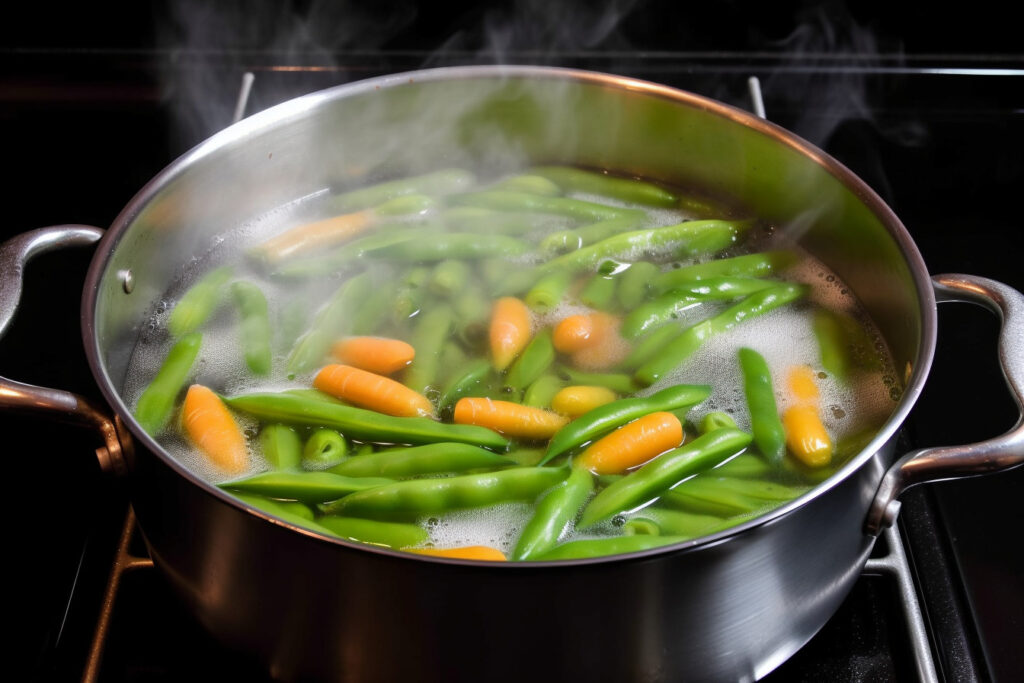
16. Use Cooking Water to Fertilize Plants
Use Cooking Water to Fertilize Plants
Have you ever thought about making your leftover cooking water into a valuable treat for your plants? It’s time to step up your gardening skills and give your plants a nourishing gift. When you boil pasta, steam vegetables, or cook eggs, important nutrients like phosphorus, nitrogen, and calcium dissolve into the water. Instead of wasting this nutrient-rich mixture by pouring it down the drain, let it cool and use it to water your plants. This eco-friendly trick not only quenches their thirst but also acts as a natural fertilizer, promoting steady growth and reducing the need for extra fertilizers.
You don’t need to be an expert gardener or have a lot of money to transform your garden into a thriving paradise. Using cooking water as a special plant potion is a simple, cost-effective, and eco-friendly alternative to composting or buying fertilizers from the store. It helps your soil retain moisture, reducing the need for frequent watering and naturally storing nutrients.
So, the next time you’re in the kitchen, save that precious cooking water and give your plants a spa treatment. Start with water from cooking pasta or basic steamed vegetables, and don’t be afraid to get creative with your organic mixtures. Watch your garden thrive as you nourish it with this resourceful and environmentally friendly approach.
17. Regrow Kitchen Scraps
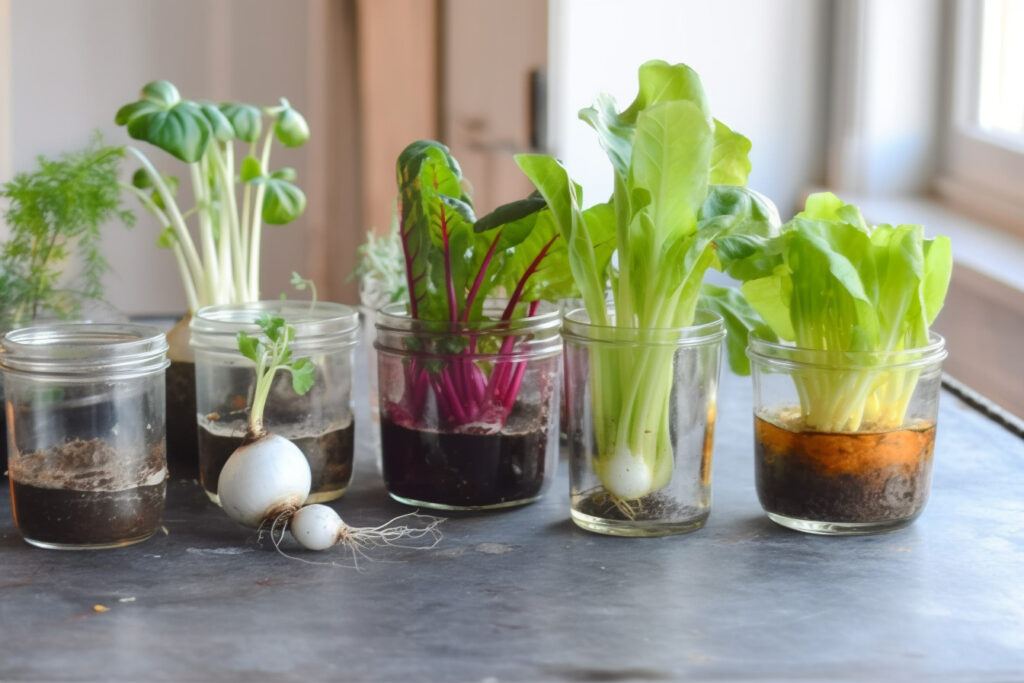
Regrow Kitchen Scraps
Turn your kitchen leftovers into a green garden and discover the wonder of regrowth! This sustainable approach helps you save money, reduce waste, and learn about nature. You don’t have to be an expert gardener to give those leftover celery, onion, or beet scraps a second chance.
With a little care and creativity, you can grow leafy vegetables, bulb veggies, and even fruits like avocados and citrus from these scraps. Simply place the inedible parts in shallow water or soil, depending on the plant, and soon you’ll see your kitchen scraps transform into a vibrant green oasis.
Once your scraps have taken root and started growing, transfer them to pots or plant them outdoors, treating them like any other plants in your garden. Make sure to keep them well-watered and give them a boost with natural-based fertilizers. If you encounter unwanted pests, use trusted pesticides following the instructions on the label. Before you know it, you’ll be enjoying the benefits of a thriving garden, all while recycling your kitchen leftovers.
Get ready to connect with nature and embark on a sustainable and enjoyable adventure in your own backyard. This clever technique reduces waste and saves you money on buying new plants. It’s also a great educational project for kids, teaching them about plant growth and sustainability.
18. DIY Seed Tape
DIY Seed Tape
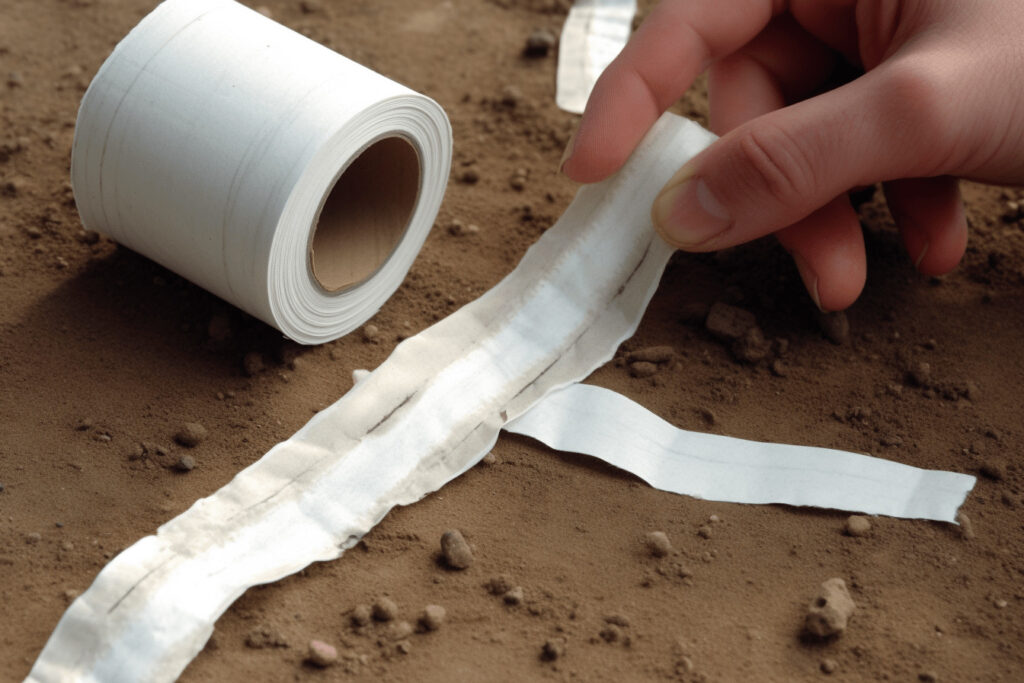
Discover your inner gardener and have some fun with this DIY seed tape project that’s both practical and enjoyable! Get ready to create neatly spaced rows for your seeds using everyday items found in your home. Grab a ruler, marker, single-ply toilet paper, seeds of your choice, toothpicks, white flour, and water – we’re about to dive into a creative adventure!
To start, prepare the seed glue by mixing 2 tablespoons of white flour with 1 tablespoon of water. Make sure the consistency is not too watery to avoid the seeds becoming soaked. Next, unroll the single-ply toilet paper to the length you desire and fold it horizontally, creating a crease. Check the spacing recommendations on your seed packet (e.g., carrots require 3 inches of space between seeds). Take your ruler and marker, and mark the seed locations along the crease of the toilet paper, starting about an inch from the edge.
Now it’s time to get sticky! Take a toothpick and dip it into the seed glue. Pick up a seed with the toothpick and carefully place it on each marked spot. Once all the seeds are in place, apply a small amount of seed glue around the edges of the toilet paper. Fold the toilet paper in half at the crease and seal the edges together. Allow it to sit for a couple of hours until the glue dries.
When you’re ready to plant, simply unroll your seed tape masterpiece into a garden furrow and cover it with soil. And there you have it! Your garden will surely impress the neighbors with its perfectly spaced and planted seeds.
19. Succession Planting
Succession Planting
Wave goodbye to inconsistent harvests and welcome continuous abundance with succession planting! This smart gardening technique extends your harvest by either spacing out plantings of the same crop or choosing varieties with different maturity dates. There are four great ways to do this: staggered plantings of the same vegetable, planting different vegetables in succession, pairing compatible vegetables in the same area, or selecting the same vegetable with varying maturity rates.
Implement these methods and witness the transformation of your garden into a thriving paradise. For a continuous harvest of beans, plant new batches every two to four weeks. As the season progresses, replace early-season peas with eggplants. Pair up plants strategically to increase productivity, or select early, mid, and late-season varieties of the same crop for a staggered harvest.
Maintain nutrient-rich soil by adding compost or leaf mold between plantings, and don’t hesitate to remove vegetables that have passed their prime. With succession planting, your garden will become the talk of the town, providing you with a steady supply of fresh produce throughout the season.
20. Spring Weeding: Use the Right Tools
Spring Weeding: Use the Right Tools
When it’s time to weed your garden, it’s important to use the right tools to ensure efficiency and keep your plants healthy. Handheld weeders, hoes, and garden forks are ideal for smaller areas or working around delicate plants. They allow you to remove weeds effectively without causing harm. These tools are designed to target the weed’s root system, making it easier to extract them from the soil and prevent them from growing back. Moreover, using the proper tools helps maintain the soil’s structure, preventing erosion and preserving its integrity.
If you’re dealing with larger areas or stubborn weeds, a long-handled weeder is a great option. It offers more leverage for pulling out weeds and reduces strain on your back, making the task more comfortable and less physically demanding. There are different styles and designs available, such as stand-up weeders that allow you to remove weeds while standing upright, or winged weeders that easily slice through the soil and cut weed roots. Investing in the appropriate weeding tools not only makes the process more efficient but also contributes to a healthier and more vibrant garden.
21. Use A Pantyhose To Support Plants
Use A Pantyhose To Support Plants
Imagine this: the gentle breeze caressing your delicate garden plants, their slender stems in need of some tender support. What could be better than the flexible, soft embrace of old pantyhose to give them the care they deserve? Yes, you can stretch those pantyhose or tights around your fragile plants, providing them with a loving hug as they grow. This clever technique not only helps your plants stand upright with confidence but also greatly reduces the risk of damage to their precious stems.
Plant Herbs With Vegetables
Adding herbs like basil, dill, and chives to your vegetable garden brings numerous advantages. These versatile plants not only repel unwanted pests but also improve the taste of your homegrown vegetables. When you practice companion planting, you’re fostering a vibrant and diverse environment where your garden flourishes. Additionally, the combination of different plants creates a visually appealing spectacle as your garden bursts with life.
Imagine the beautiful blend of colors and delightful scents when elder, feverfew, lavender, and garlic team up with chamomile, lovage, marjoram, parsley, and amaranth. Together, they boost growth, repel insects, and attract helpful pollinators like bees and butterflies. Experience the magic of herbs as some act as brave protectors against insects, such as tansy, pennyroyal, feverfew, and chives, while others serve as “trap crops,” drawing pests away from your precious vegetables. And that’s not all – herbs like borage, comfrey, and yarrow also work as compost enhancers, breaking down waste and turning it into valuable nutrients for your garden. Embrace the enchantment of companion planting and watch your garden thrive with the mesmerizing power of herbs!
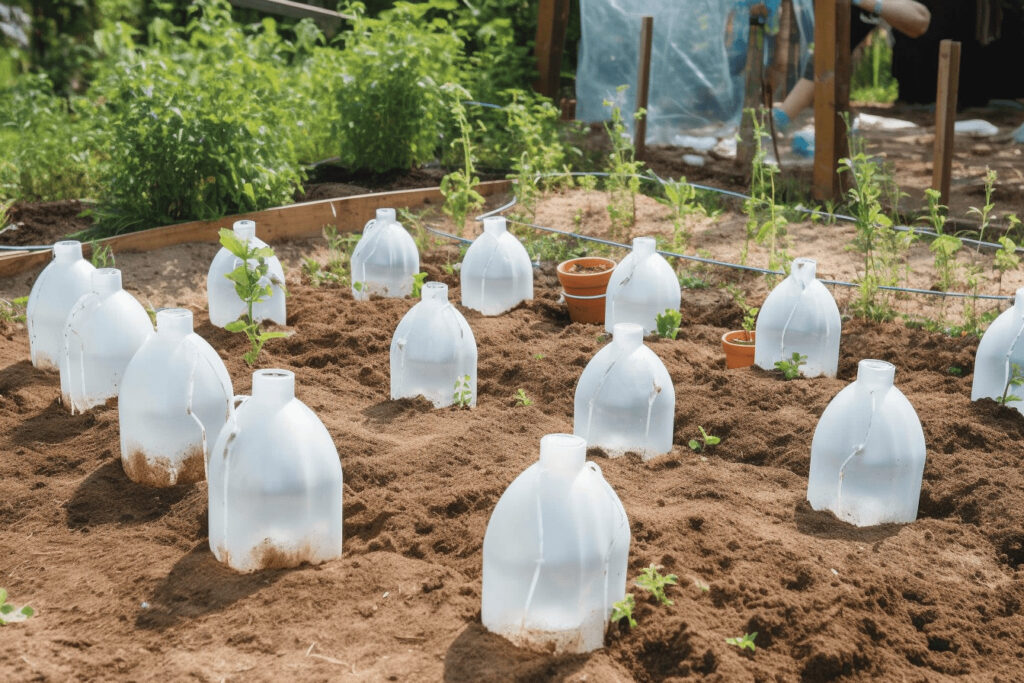
23. Milk Jug Mini Greenhouses
Milk Jug Mini Greenhouses
Tap into the potential of a simple milk jug to turn your garden into a flourishing paradise of early-season vegetables. By repurposing milk jugs as mini-greenhouses, you can protect your delicate seedlings from frost, wind, and pesky critters while providing them with an optimal environment for growth. Whether your goal is to be the first to harvest delicious tomatoes or simply enjoy a bountiful harvest, this tried-and-true technique of using modified milk jugs or juice bottles as cloches will surely make your neighbors envious.
Here’s how it works: Cut out the bottom of a milk jug or juice bottle, leaving one side attached as a flap. This flap will serve as an anchor for your cloche. Place the jug over your seedlings and secure the flap with a rock or brick to prevent it from being blown away. Keep the caps of the jugs, as you’ll need them to cover the jugs at night, protecting your plants from frost and cold air. During the day, remove the caps to allow the jug to dry out and warm up. On sunny days, you can even remove the jug entirely to let your seedlings soak up the sunlight. With this clever milk jug technique, you’ll be enjoying juicy tomatoes and delicious veggies long before your neighbors even start thinking about harvesting their own!
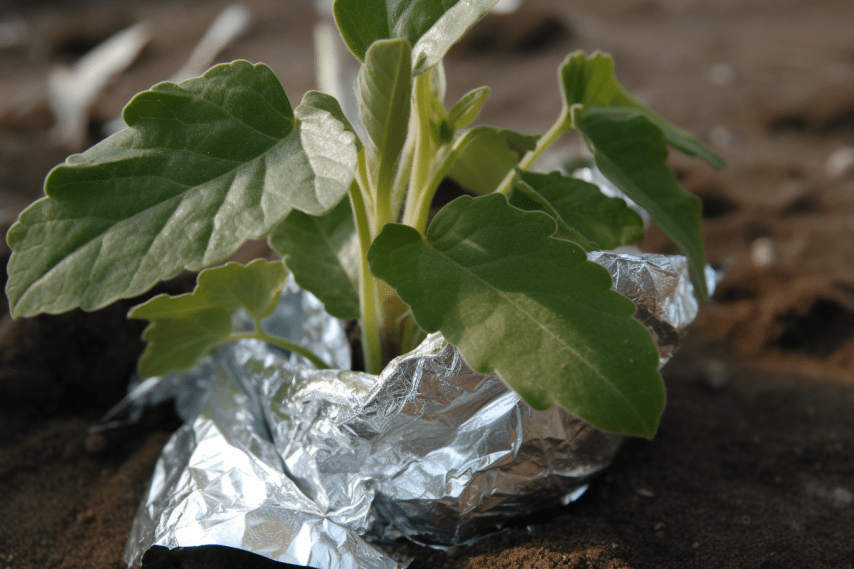
24. Aluminum Foil for Sun-Loving Plants
Aluminum Foil for Sun-Loving Plants
Take your gardening skills to the next level with a surprising secret weapon: aluminum foil! Not only is it a great way to reduce, reuse, and recycle, but it also provides numerous benefits to your garden. Whether it’s keeping seedlings warm, reflecting heat onto plants, maintaining soil moisture, or repelling pests, aluminum foil is a versatile and affordable tool to enhance the health and productivity of your garden.
Wait, there’s more! You can use aluminum foil to keep away deer and other animals or to attract butterflies. Just wrap foil around young tree trunks or hang strips in the garden to scare off animals. You can also place small pieces of foil around your plants to create sunny spots where butterflies can rest. Give aluminum foil a try in your garden and see your plants thrive like never before! It’s a simple and inexpensive solution for your sun-loving plants.
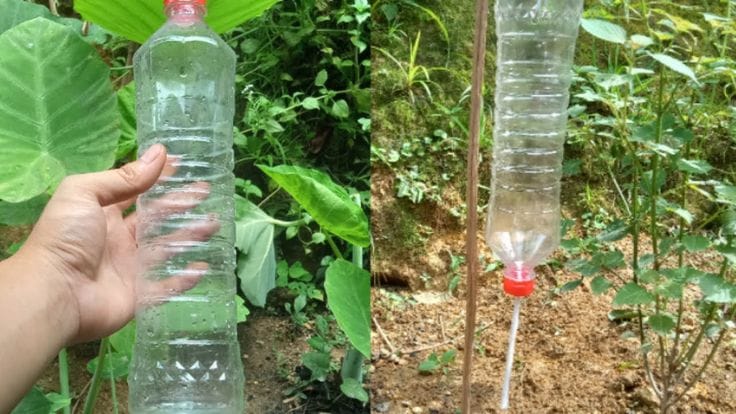
25. Create A DIY Drip Irrigation System Using Plastic Bottles Or PVC Pipes
Create A Diy Drip Irrigation System Using Plastic Bottles Or PVC Pipes
Here’s another useful tip for when you go on summer holidays. You can create your own drip irrigation system using plastic bottles or PVC pipes. It’s a simple and effective way to water your plants gradually and efficiently. This DIY system helps conserve water by delivering it directly to the roots, reducing evaporation and runoff.
Installing and maintaining a DIY drip irrigation system is easy. You can use basic materials like plastic bottles or PVC pipes to customize it for your garden. It provides precise watering because you can control the water flow and adjust the amount each plant receives based on its needs. Plus, the system is versatile and can be adapted to different gardening situations.
You can use this DIY drip irrigation system for various plants like vegetables, herbs, and flowers. It’s adaptable, allowing you to modify it as your garden evolves. This system becomes incredibly handy when you’re away from home for an extended period or when you’re too busy to water your plants daily. It ensures that your plants receive the water they need consistently, even when you can’t tend to them regularly.
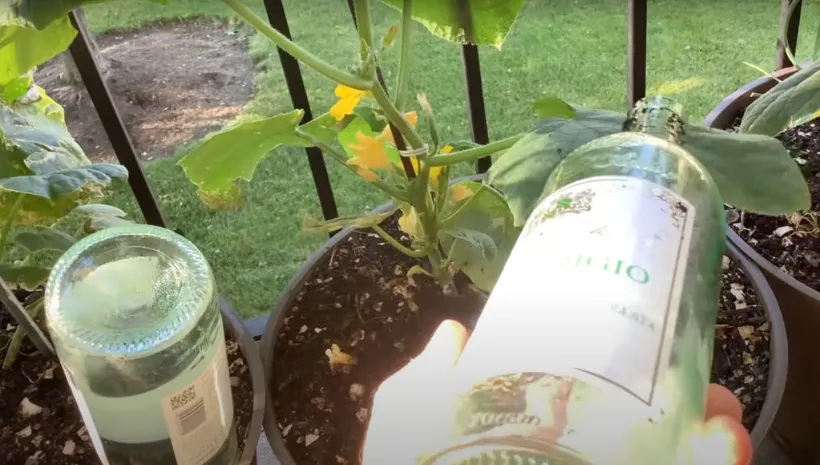
26. Put Wine Bottles In Your Garden
Put Wine Bottles In Your Garden
If you liked the previous idea but thought it lacked visual appeal, and if you happen to be a wine enthusiast, then this next concept is perfect for you. It offers a win-win solution that allows you to water your plants in a stylish manner while also giving you a reason to open another bottle of wine. It’s a delightful combination that benefits both your plants and your enjoyment. It’s truly a win-win situation!
Once your masterpiece is complete, fill it with water, select your plant, and make sure the soil is moist. Dig a 2-inch deep hole in the soil, insert the bottle, and watch your plants thrive while you’re away. Refill the bottle when needed, and enjoy your worry-free vacation knowing your plants are well-hydrated. This clever and customizable plant waterer is perfect for the forgetful gardener or anyone taking some well-deserved time off.
Once your beautifully decorated bottle is ready, fill it with water. Choose a plant that you want to water and ensure that the soil is already moist. Dig a 2-inch deep hole in the soil and insert the bottle into it. Now sit back and witness your plants thrive while you’re away. Simply refill the bottle as needed, and enjoy your vacation without worrying about your plants going thirsty.
This ingenious and customizable plant waterer is ideal for gardeners who tend to forget or for those who are taking a well-deserved break. It provides a worry-free solution for keeping your plants hydrated.
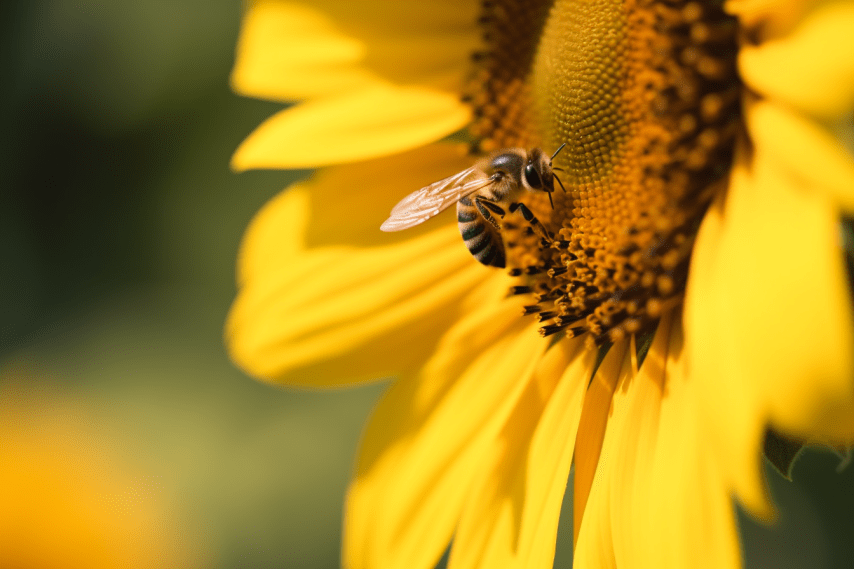
27. Plant A Bee-Friendly Garden
Plant a Bee-Friendly Garden
Bring life and vibrancy to your garden by planting a variety of colorful flowers like lavender, sunflowers, and zinnias. By doing so, you’ll create a delightful haven for important pollinators such as bees and butterflies. Observe the magical transformation as these essential creatures gather in your garden, drawn by the nectar-filled flowers. A garden that welcomes bees and butterflies not only enhances pollination and increases your yield but also becomes a captivating display of colors and vitality. It becomes a charming sanctuary where you can relax and immerse yourself in the beauty of nature.
Create a bee-friendly garden by choosing flowers and trees that bees love, like lavender, bluebells, echinacea purpurea, and fruit trees such as apple and cherry. Make sure to have a variety of flowers that bloom early and late in the season, so bees have food throughout the year. Avoid using pesticides that harm bees and instead use natural fertilizers and companion planting.
Include flowers that are easy for bees to access, and leave some weeds for extra nectar. Build bee hotels to provide shelter, and have a shallow water source for bees to drink from. By following these tips, your garden will become a lively sanctuary for both you and the buzzing bees.
28. Create A Garden Journal
Create A Garden Journal
Hey, guess what? Keeping a garden journal can really help you become a better gardener! Just write down important stuff like when you planted your plants, how they’re growing, and any problems or bugs you come across. This way, you’ll learn a lot and improve your gardening skills.
And that’s not all! Your garden journal becomes a super useful guide for future planning. It’ll have all the important info you need, like when to plant, when to fertilize, and how to deal with pests. You’ll learn from your successes and mistakes, getting better at gardening over time. Plus, your journal will be a wonderful keepsake, reminding you of all the hard work and beautiful results you’ve achieved.
Guess what? Your garden journal is even more amazing than you thought! It becomes an incredibly valuable guide for your future garden plans. You can refer to it to make smart decisions based on what worked and what didn’t in the past.
By jotting down important details like when you planted, when you fertilized, and how you dealt with pests, you’ll learn from both your successes and challenges, becoming a better gardener along the way. And here’s the best part: your garden journal also becomes a cherished keepsake. It lets you look back and relish all the hard work, dedication, and beautiful results you achieved in your garden.
29. Mulch With Grass Clippings
Mulch With Grass Clippings
Guess what? You won’t believe the hidden treasure in your lawn! Those grass clippings you usually consider a bother are actually a goldmine for your garden. You can use them in so many helpful ways. When you spread them as mulch, they enrich the soil, stop some weeds from growing, and keep moisture locked in.
Whether the clippings are fresh or dried, they work wonders for your landscape by cooling the roots, saving water, and giving back up to 25% of the nutrients that plants take from the soil. And here’s the best part: it’s an eco-friendly way to recycle waste and reduce your gardening tasks. Who knew mowing your lawn could be so rewarding?
Here’s a handy tip: when using fresh grass clippings as mulch, a thin layer of only ¼ inch (6 mm) is perfect. This allows the grass to break down without any unpleasant smells or rotting. On the other hand, dried clippings can be applied in thicker layers, which makes them great for vegetable crops or for lining garden paths to keep mud and weeds at bay.
Even during late fall to early spring, you can mix grass clippings into the soil to add nitrogen. It works especially well when combined with materials like dry leaves or sawdust, which release carbon. So, the next time you mow your lawn, don’t toss those grass clippings away. Instead, give your garden a nourishing treat!
30. Get Rid Of Unwanted Weeds With White Vinegar And Water
Get Rid Of Unwanted Weeds With White Vinegar And Water
To remove unwanted weeds, you can make a weed killer spray by mixing equal amounts of white vinegar and water in a spray bottle. Simply apply this mixture directly onto the weeds. White vinegar is a natural and safe alternative to chemical weed killers. It is non-toxic and does not harm people, pets, or the environment. It works well against various types of weeds, including dandelions, chickweed, thistle, crabgrass, and quackgrass.
This inexpensive and easy solution is a natural and environmentally friendly way to effectively eliminate weeds from your garden. It is a safe and non-toxic option that can help you maintain a weed-free garden without causing harm to the environment.


 For 2024")


